|
Faucets and Water Conservation
Leaky Faucets
Leaky faucets are a surprisingly serious home plumbing problem. Just a single faucet leaking at a rate of 1 drip/second will waste enough water in a year to fill 150 bathtubs! All this leaking adds up; Each year U.S. homes leak an averatge of 1 trillion gallons. This is equal to the annual water use of L.A., Chicago, and Miami combined. The next time you have some spare time, look around your house and identify possible sources of water leakage. Not only are you working to conserve a precious resource, you could also save hundreds of dollars on your annual water bill.
Fixing Your Faucet
How To Fix A Leaky Faucet
Step 1: Shut off the cold and hot water supply valves, which are usually below the sink. If they're not below the sink, shut off the master water supply for the whole house. Then follow the directions below according to the type of faucet you need to repair.
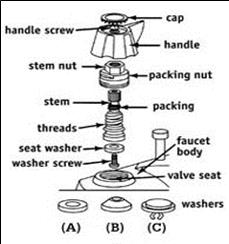
Compression Faucet
Step 2: Remove the decorative index cap from the handle. Remove the handle screw and carefully pry under the handles to remove them.
Step 3: With the handle removed, use an adjustable wrench to loosen the bonnet nut that holds the stem in place. Thread the stem out of the faucet and loosen the screw that holds the washer to the stem.
Step 4: Find an exact replacement washer and fasten it to the stem with a new washer screw, if necessary. Then reinstall the stem, bonnet nut and handle.
Two-Handle Washerless Faucet
Step 2: With a two-handle washerless faucet, access the cartridge as you would for a compression faucet start at the valve handle and work your way down.
Step 3: Remove the cartridge and replace it with a new unit. Then reinstall the stem, bonnet nut and handle.
Single-Handle Washerless Faucet
Step 2: With a single-handle faucet, the exact procedure to remove the valve cartridge will vary by manufacturer. Start by removing the handle screw, typically located under the handle or on top of the handle under a hood. Remove the faucet handle screw and remove the handle.
Step 3: Once the handle is off, loosen the nut that conceals the valve cartridge.
Step 4: Remove the clip, which holds the valve cartridge in place. Pull out the valve cartridge and replace it with a new unit. Then reinstall the bonnet nut and handle.
 - -
Please contact us for more information.
Resources for Additional Ideas & Information
Funding for this project comes from: California Environmental Protection Agency State Water Resources Control Board
Funding for this project has been provided in full or in part through an agreement with the State Water Resource Control Board. The contents of this document do not necessarily reflect the views and policies of the State Water Resources Control Board, nor does mention of the trade names or commercial products constitute endorsement or recommendation for use.
(Gov. Code. 7550; 40 CFR 31.20)
Funding support to create more user-friendly, detailed information in order to facilitate better water resources management and public awareness also was generously provided by the State of California Department of Water Resources (DWR), from the Safe Drinking Water, Water Quality and Supply, Flood Control, River and Coastal Protection Bond Act of 2006 via Humboldt County on behalf of the seven county North Coast Resource Partnership region under the North Cost Integrated Regional Water Management Plan (NCIRWMP) Proposition 84 Planning Grant.
|