|
7: Test Your Soil
Infiltration Testing
An infiltration test will help you determine the soil’s capacity to absorb and percolate water down into the lower layers. The ability of soil to drain water is one of the most important considerations for understanding the site.
You may use an infiltration test like this to:
- Size a new rain garden
- Test existing facilities
- Find the fastest infiltration rate on your site (in areas that meet appropriate setback requirements as described in “8 Site Bioretention for Infiltration”).
Testing is not needed for filtration facilities, which are lined to prevent water from entering the native soil.
Existing soil or geologic maps can be used in the initial steps to evaluate the site’s potential for infiltration, but should never be used alone. Ground truthing with infiltration tests very often reveals different conditions in different places on the site at different depths.
Timing & Location
Tests should not be conducted:
- in the rain
- within 24 hours of a storm greater than 1/2 inch (check your local weather report, place a rain gauge in your yard, or check NOAA’s website for recent rainfall: http://water.weather.gov/precip/)
- when the ground is frozen.
The test measures the soil’s ability to infiltrate water in a very small and specific area. If the proposed facility has a large area, multiple measurements within the area are suggested to properly assess the site’s suitability.
In new development, infiltration tests should be performed across the proposed development area prior to placing structures on the ground. This provides the opportunity to install drainage facilities on optimal soils and geology to reduce their size and cost. If buildings are proposed on high infiltration soils and facilities proposed in lower infiltrating soils, plans can be modified to improve stormwater management and decrease cost. The earlier in the site development process that infiltration tests are conducted, the better. Regardless of soil type, the infiltration rate will be needed to select and design facilities.
In retrofits, where you have a limited area to choose from, it’s ideal to test directly over or as close to the proposed facility.
Number of Tests
The number of infiltration tests for large sites varies widely depending on local regulations. More tests will be needed if there are many different types of soil conditions across the site. In urban sites, where soils may have been disturbed a number of times over many years, soil conditions may vary greatly over small distances.
Safety
Call 811 prior to digging if there is any possibility of underground wires or pipes at your test site. Make sure the bottom of the rain garden is at least 3 feet above the high groundwater table (where you would find water if digging a hole in the soil during the wet season). Contact your local water district, County Planning Department, local well drilling company, local Resource Conservation District, landscape contractors, or others to determine depth to groundwater at your site. If you cannot find any information on depth to groundwater at your site, you can drive a 1” steel pipe into the ground and insert a metal tape rubbed with chalk into the pipe to determine the ground water level. All relevant Occupational Safety and Health Administration (OSHA) regulations should be observed. If a hole big enough to climb in (i.e. test pit) is deeper than 4’, the sides must be graded back to a gentle slope of 3H:1V or if walls are vertical, shoring (reinforcement to prevent collapse of the walls) is required. “Excavation should never be left unsecured and unmarked, and all applicable authorities should be notified prior to any work”.
 Equipment Needed
To perform an infiltration test, you will need:
- Shovel and/or post-hole digger
- Yardstick or ruler
- Water source
- Some clean gravel (if you are in clay soils)
- Pencil
- Paper
- Watch or timer
- Watering can (optional)
Testing depth
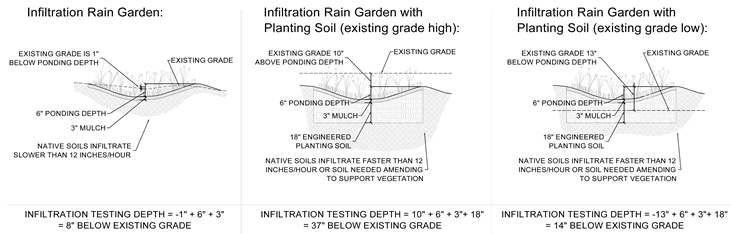
Infiltration testing should be performed at the depth where you expect the bottom of the facility to be located; however, consider the possibility that infiltration testing will determine the depth and location of excavation needed . Soils just 6" below existing grade may be suitable for infiltration and have enough nutrients to support plant growth. In this case, a very simple facility that doesn't replace or amend the native soils should be considered by testing the soils shallowly (see Figure 2a).
Existing grades will also help determine appropriate testing depths. For example, If the proposed finish (i.e. final) grade will be lower than the existing grade, as in Figure 2b, then the testing depth will be deeper than the rain garden cross section itself. In this case, the designer would’ve known ahead of time that they wanted to amend the soils; so this adds 18” of excavation to test the soils at the proper depth. Figure 2c shows that same rain garden configuration except the finish grade is higher than the existing grade. In this case, to raise the grades, native soils could be amended but an engineered soil mix would have to be used to achieve the rest of the depth. For more information on amending native soils and engineered soil mixes for bioretention facilities, see “8 Amend Soils for Bioretention”.
Test Infiltration
A simplified ‘falling head’ test is described as follows.
- Dig a test hole with a post hole digger or a larger area with a shovel. The width/area of the hole doesn’t matter. Dig a hole to the expected depth of the rain garden as discussed above.
- If you don’t know how to identify clay soils, perform a ribbon test as described in a section below.
- If soils are clayey, scrape the sides of the hole a little (i.e. scarify). Remove the scraped material in the bottom of the hole and place an inch or so of clean gravel at the bottom; otherwise, the tiny clay particles will be suspended in the water to form an impermeable sheen around the sides and bottom of the hole.
- Fill the hole with water gently to a depth of water expected if the rain garden filled to the rim. You can mark this depth by sticking a pencil or nail into the side of the hole. Record the exact time you stop filling the hole (if soils are fast draining, measure time down to the second) and the time it takes to drain completely.
- Refill the hole again and repeat step 2 two more times. The third test will give you the best measure of how quickly your soil absorbs water when it is fully saturated, as it would be during a rainy period of the year or during a series of storms that deliver a lot of rainfall in a short period of time. The average infiltration rate should decrease with each round. If it doesn’t, repeat the test a few feet away.
- Divide the distance that the water dropped by the amount of time it took for it to drop. For example, if the water dropped 6 inches in 12 hours, then 6 divided by 12 equals 1/2 inch per hour of infiltration. If the slowest infiltration rate measured of the three trials is less than 1/2 inch per hour, then you should dig another 3 to 6 inches deeper and repeat the above steps to see if there’s a faster draining soil beneath your test holes. This will help to minimize the depth of the rain garden and reduce the cost of excavation and replacing native soil with amended planting soil (See “4 Build a Rain Garden” and “10 Amend Soils for Bioretention”). Repeat this process at various depths down to another 2 feet, or until you have at least 1/2 inch per hour infiltration.
Confirm Vertical Separation
- Voids in the soil convey water down and away from the site like a big, slow-draining underground pipe. Adequate depth of dry soil beneath an infiltration facility ensures that the facility won’t damage important structures by backing up and flooding them. (See “8 Siting Bioretention for Infiltration”.) Now that infiltration testing is done, look for bedrock or other impermeable subsurface layers that may delay infiltration. Dig the hole another 2 feet of depth from the bottom of the proposed rain garden. If the soil is pretty consistent all the way down then one criteria for vertical separation is met.
- Now look for a seasonal high groundwater table by digging a hole to an additional one foot of depth. If the hole doesn’t fill up with water, then groundwater levels are sufficiently deep and the second vertical separation criterion is met.
- Fill the hole back up.
Interpret Your Results
To infiltrate, all other siting criteria in “8 Site Bioretention for Infiltration” must be met.
If:
- Your infiltration rate is less than 1/2 inch per hour AND
- vertical separation criteria cannot be met,
test other possible locations (preferred) or use a lined filtration facility to prevent flooding and protect groundwater resources.
If:
- Your infiltration rate is less than 1/2 inch per hour AND
- vertical separation criteria can be met,
test other possible locations (preferred) or install an underdrain in your infiltration facility per “4 Build a Rain Garden”.
If:
- your infiltration rate is greater than 1/2 inch per hour AND
- vertical separation is confirmed,
then this location is suitable for a rain garden or other infiltration facility. (Porous pavements are not specifically addressed in this guidance, but it’s worth noting that soils infiltrating at 1/10 inch per hour or greater are suitable for porous pavement since porous pavements manage rainfall, not runoff.)
If:
- your infiltration rate is greater than 12 inches/hour,
then this location is suitable for a rain garden or other infiltration facility. However, consider replacing the first 18” of native soil with an engineered 3-way mix as described in “10 Amend Soils for Bioretention”.
Installing a rain garden or other infiltration facility in soils with rates exceeding 12 inches/hour is not recommended because the facility may pollute groundwater resources. This is because runoff may not be retained in the soil long enough before it joins the groundwater table.
If:
- your hole caves while or after pouring water in AND
- the infiltration rate slows to nothing,
then this location is probably not suitable for an infiltration rain garden. Soils that behave like this will be a mix of sand and clay; redirecting runoff from large areas into the relatively small rain garden area will cause this kind of soil to become cement-like. Test other possible locations (preferred) or use a lined filtration rain garden.
Ribbon Testing
As indicated above, to properly install an infiltration facility, you need to approximately identify the soil texture of your existing native soils, which may range from more sandy to more clayey.
Determine soil texture
- Take a handful of the soil you have excavated from your infiltration test. Pulverize it in your hand and remove any bits of organic matter or obvious rocks.
- Wet it with a small amount of water and rub it between your thumb and index finger. Don’t saturate it until it is runny mud. You might feel stickiness, grittiness, or smoothness. The grittier the feel, the more sand is present in your soil. The slicker the soil, the more clay in it. Smooth soils are sometimes an indicator of a fine silt or loam. Discard the soil.
- Next, take another sample in your hand. Wet it until it has the consistency of dough. You should be able to form a ball that holds together with the soil in your palm. If you cannot get the ball to form, then your soil is very sandy. In most soils, however, you should be able to create a rough ball (see picture below).
- Knead the soil together between your thumb and fingers and attempt to form a ribbon. As you build the ribbon, it will either hold together or break off.
Interpret Your Results
If the soil forms a ribbon:
- less than 1 inch in length before it breaks, the soil is sandy or silty.
- 1 to 2 inches in length before it breaks, the soil is clayey (i.e. has some clay).
- greater than 2 inches before it breaks, the soil is clay. You may find that the infiltration rate is so low that, depending on the available area, you’ll need to install an underdrain beneath your infiltration facility per “4 Build a Rain Garden”.
Bibliography
Emanuel, Robert, Derek Godwin and Candace Stoughton. The Oregon Rain Garden Guide. Stormwater Management Manual. Salem, OR: Oregon State Univesity, 2010.
Cahill, Maria & Derek Godwin. Infiltration Testing. Fact Sheet. Salem, OR: OSU Extension, 2011.
Photo Credits
Figure 1 – 3: Maria Cahill
Figure 4 -5: Gina Emanual
Download/View the 5C Program Stormwater Management Handbook:
Download by Chapters:
For more information, contact us
©2012. Five Counties Salmonid Conservation Program and Green Girl Land Development Solutions. This publication may be photocopied or reprinted in its entirety or in portions for noncommercial purposes. This publication is available in an accessible format on the 5C web site at http://www.5counties.org/docs.htm. If future documents are based on this document, credit should be given with the following wording: “Portions of this document are adapted from “7TestSoil.doc”, http://www.greengirlpdx.com/JOBS/5CSCP/00IntroLID.doc. ©2012, Five Counties Salmonid Conservation Program and Green Girl Land Development Solutions. No risk or liability by either of these organizations shall be assumed for information offered in this document.”
Back to Land Use Planning page
Back to Programs Page
|