|
2: Disconnect Impervious Areas
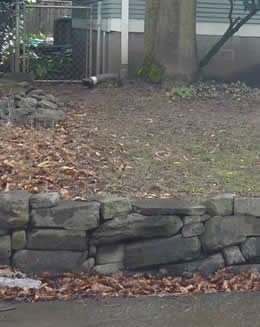
Rainfall over an impervious area (one that does not allow water or other fluids to pass through or be absorbed) tends to quickly end up in storm drains, which often make their way into a creek, or discharge directly in a creek. The best way to restore watershed health is to prevent runoff in the first place. For more information, see "1 Minimize Impervious Area". Aside from that, disconnecting impervious areas from storm drains and creeks is a simple, cost‐effective way to reduce runoff volume and protect your watershed. Contained planters, downspout disconnection for roofs, and vegetated filter strips for ground level impervious areas (sidewalks, driveways, roads) are three ways to reduce runoff from small areas.
Contained planters placed over existing impervious areas, on the ground or roof, intercept rainfall and then evaporate it back. When runoff does occur, it moves through two different forms: sheet flow (aka overland flow) and concentrated flow. Sheet flow occurs first, when rain falls on roof or pavement and "sheets" across the surface. Eventually, sheet flow may arrive at either a roof gutter or a curb and becomes concentrated flow. Design and management of both sheet and concentrated flows must be carefully done to prevent erosion, which in turn protect water quality.
Siting for Infiltration
Downspout disconnection and vegetated filter strips rely on the ability of the soil to absorb and filter runoff. Infiltration facilities, if not sufficiently separated, both horizontally (i.e. setbacks from infrastructure) and vertically (with enough depth to allow proper function), from various conditions have the potential to cause damage. For more information, see “8 Site Bioretention for Infiltration”.
Downspout Disconnection
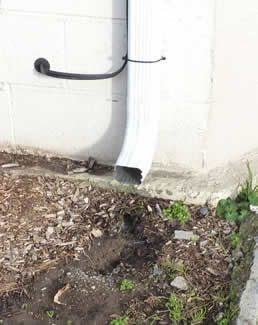
Many modern houses in developed areas have a gutter and downspout assembly that conveys all the runoff from their roof into a public storm drain. This storm drain probably outlets to a natural area, where pollutants from the roof and the additional runoff volumes collected impact water quality. Disconnecting the downspout means directing runoff from your downspouts to a landscape area instead of allowing your water to flow directly to a creek via the storm drain. In many rural areas, where pipe infrastructure is limited, downspout disconnection is common practice.
Design
Since downspouts are usually attached to a building wall, if you have a basement and not pier or post footings, the first step is to cut the downspout and attach an extension on it that will convey stormwater safely away to a landscape garden or lawn area. Since water in soil can move twice as fast horizontally as vertically and easily flood the basement, water should be moved at least 10 feet away from any basement walls or other sensitive infrastructure.
Don’t put a downspout outlet in an area that is too small to drain the water properly. A landscape area at least half the size of the roof area draining to the downspout is a rule of thumb that should work in most soils. Smaller areas may work in fast draining soils like sand.
There are many kinds of downspout extensions available, some of which can be found at your local hardware store. Or you can use a piece of downspout laid on its side. A lined conveyance swale is another alternative; see “11 Convey Water in Swales” for more information.
Beyond the 10-foot setback, there are a number of ways to safely disperse and infiltrate runoff at the end of your downspout:
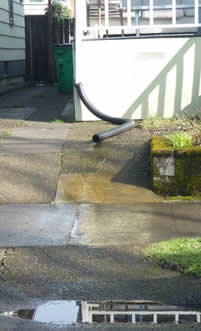
Water can be deposited directly into the yard. However, erosion from this concentrated flow is likely. If you’ve tried this simple approach, but there is erosion, spread it out using the suggestions that follow. Vegetation is great at holding soil, but too much vegetation at the mouth of a simple downspout extension could cause water to back up and flood the basement anyway. Downspout extensions (Figure 2) – perforated at the end – will prevent erosion by slowing flows and spreading them out over a larger area.
Specifications
Gutters, downspouts, extensions and other components used to move stormwater around the site should be durable and non-polluting. Plastic, like all petroleum products, are broken down by UV light and microbial action in soil. Choose materials that are UV and rust resistant. Avoid copper, galvanized steel, and iron. Water moving over these materials picks up portions of the metals that pollute ground and surface waters. Stainless steel, high density polyethylene (HDPE), low density polyethylene (LDPE), and aluminum are some good alternatives.
Construction
Steps for disconnecting:
- If your downspout connects to the sewer system directly via a pipe, measure the existing downspout from the top of the standpipe. Make a mark at least 9 inches above the standpipe. A standpipe is the pipe leading into the below-ground storm drain.
- Cut the existing downspout with a hacksaw at the mark. Remove the cut piece.
- Plug or cap the standpipe. Do not use concrete or other permanent sealant.
- Attach an elbow to the newly cut downspout by inserting the elbow over the downspout. Then use at least two sheet-metal screws to secure the two pieces.
- Measure and cut the downspout extension so that when it is attached, it will direct flow to an area that won’t cause flooding (see Design above). Fit the extension over the elbow and attach it with sheet-metal screws.
- Since the extension does not connect directly to the standpipe or leads into a rain garden, use a splash block, gravel, or a flow spreader to prevent soil erosion.
- Remember that each section should funnel into the one below it. All parts should be securely fastened together with sheet-metal screws.
Maintenance
Be sure to maintain your gutter system. Inspect it regularly for leaks, sagging, holes, or other problems. Inspect annually and clear debris from gutters, elbows, and other connections before the rains arrive. If you find erosion, spread the flow out along areas of similar elevation ( i.e. don’t direct water downhill) using a perforated spreader or other means.
If you find that water isn’t infiltrating into your landscape area or lawn and you’re meeting the above criteria, the area was probably compacted and impermeable. (There are no or very few voids in the soil where water can go.) In this case, restore soils by amending them with compost. For more information, see “3 Restoring Disturbed Soils”. Considering vegetating the area with tall grasses, shrubs, and the like, which will help preserve the long-term permeability of the soil and reduce maintenance. Choose native species that will tolerate moist conditions (like that of the slope area of a rain garden) and the other natural conditions at your site. For more information, see “9 Find Native Plants for Your Location”.
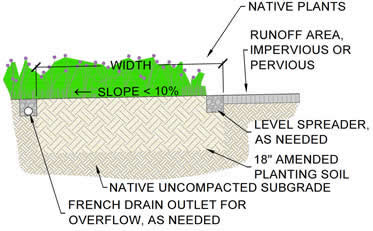
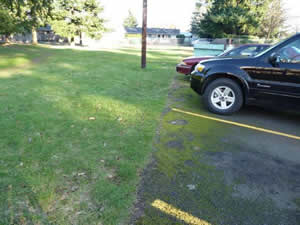
Vegetated Filter Strips
A vegetated filter strip (VFS) is an area covered in vegetation (grass and/or plants) that receives sheet flow runoff from impervious surfaces, which are located at ground level.
This guidance is for small areas with sheet flow only. More complex design and calculations are required for other conditions. Consider building a rain garden if the design criteria below cannot be met. For more information, see “4 Build a Rain Garden”.
Design
VFS design is defined the width of the landscaped area and the width of the impervious area sheet flowing into it (aka contribution area). The following design criteria apply:
- Use a VFS for contribution areas no wider than 60'.
- The VFS must abut (be located directly next to) the contribution area.
- The width of the VFS should be at least half the width of the contribution area. This may not be necessary if you will perform stormwater modeling to assist in your design.
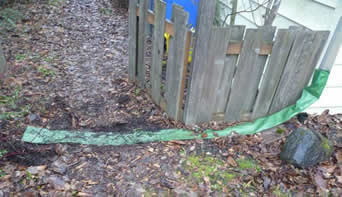
- Ensure that water actually will flow evenly into the VFS and not be blocked. For existing pavement, observe an area in the rain or run a hose on it to see where water flows. Use a level spreader if needed (Figure 8).
- Limit the slope/grade of the VFS in any direction to 10% total.
- Vegetate with native plants that tolerate moderately wet conditions and will find other natural conditions agreeable. For more information on choosing native species, see "9 Find Native Plants for Your Location".
Construction
The steps to construct a VFS are:
- Begin construction only when the contribution area is stabilized and temporary erosion and sediment control measures are in place. The strip should be installed at a time of the year when it is most likely to establish without irrigation. However, temporary irrigation may be needed in periods of little rain.
- Amend the soil to a depth of 18” per guidance in “10 Amend Soils for Bioretention”.
- Carefully grade the VFS area. Accurate grading is crucial for filter strips. Even the smallest irregularities may concentrate sheet flow and cause erosion.
- Seed, sod, or plant more substantial native vegetation. If sod is used, place tiles tightly to avoid gaps, and stagger the ends to prevent a channel from forming along the strip. Use a roller on sod to prevent air pockets from forming between the sod and soil but never compact with a vibratory compactor or heavy equipment.
- Stabilize seeded filter strips with appropriate, permanent soil stabilization methods, such as erosion control matting or blankets.
- Irrigate or hand water for a 2-3 year establishment period, see maintenance section in “1 Minimize Impervious Areas”. Irrigation after this can be done during especially hot periods when plants are at risk, but regular watering after the establishment period will invite weeds and be more work to maintain.
- Once the filter strip is sufficiently stabilized after one full growing season, remove temporary erosion and sediment controls.
 Maintenance
As with other vegetated best management practices, filter strips must be properly maintained to ensure their effectiveness. In particular, it is critical that there be even sheet flow throughout the life of the filter strip. Field observations of strips in urban settings show that their effectiveness can deteriorate due to lack of maintenance, inadequate design or location, and poor vegetative cover. Compared with other vegetated stormwater management practices, filter strips require only minimal maintenance efforts, many of which may overlap with standard landscaping needs.
Specific activities that should be performed on at least a quarterly basis (if no other time period is suggested below) include:
- Look for and remove sediment and debris at the top of the VFS after every storm event greater than one inch during the establishment period (2-3 years) and after that at least quarterly. Very small sediment accumulation (depths of less than 1/8 inch) can block or re-route runoff, causing channelization and erosion. During the fall, this may need to be done more often.
- Throughout the entire area of the VFS, sediment and debris should be removed when buildup exceeds two inches in depth. Perform this during the dry season.
- If erosion is observed (i.e. rills and gullies, channelization) stabilize with erosion control matting, and either seed or place sod in the area. For channels less than 12 inches wide, filling with crushed gravel, which allows grass to creep in over time, is acceptable. For wider channels (greater than 12 inches), regrading and reseeding may be necessary. Small bare areas may only require overseeding (i.e. casting seed over whatever is already there). If erosion cannot be stabilized long-term by the methods described so far, install a level spreader as described below.
- If pools of standing water are observed along the slope, regrade the area so that ponding will not occur. In no case should standing water be tolerated for longer than 48 to 72 hours. If no visible sediment is clogging the area, soils have been compacted. Fold a few inches of compost into the top 6” of soil, form a smooth surface, and revegetate.
- If a filter strip exhibits signs of poor drainage, periodic soil aeration (for grassed facilities) or liming may help to improve infiltration.
- Grass cover should be mowed to maintain a height of 4-6 inches. Mowers often have a setting that allows them to be set high. The deeper the roots, the better the function.
- Remove invasive plants (i.e. weeds) on a semi-annual basis: once in May and once in Sept. Native vegetation should cover at least 85 percent of the vegetated filter strip at all times. Re-vegetate as needed.
- Consider adding signage and low fencing or other messaging to alert pedestrians and drivers to the location of the VFS.
Cost
The cost of constructing VFS includes grading, sodding (when applicable), installing vegetation, and, if proposed, constructing a level spreader. Depending on whether seed or sod is applied, enhanced vegetation use, or design variations such as check dams, construction costs may range anywhere from no cost (assuming the area was to be grassed regardless of use as runoff treatment) to thousands of dollars per acre. The annual cost of maintaining filter strips (mowing, weeding, inspecting, litter removal, etc.) generally runs from $100 to $1,400 per acre (2008 costs from Southeast Michigan for commercial sites) and may overlap with standard landscape maintenance costs. Maintenance costs are highly variable, as they depend on frequency, local labor rates, proper construction of the original facilities, and most importantly, preventative maintenance.
Additional VFS Applications
Vegetated filter strips have traditionally been used by farmers to prevent precious soil resources from being lost. However, VFSs have also been used:
- As sediment pretreatment for other stormwater management facilities
- By transportation agencies to treat and infiltrate highway runoff
- Instead of rain gardens where high bedrock, groundwater tables or fragipan (non-infiltrating soil layer) exist
Level Spreader
Often, a piece of pavement is not as smooth or regular as it appears. Even very small dips and inconsistencies can concentrate sheet flow, causing erosion through the formation of channels. A level spreader, installed at the line between the contributing pavement area and the VFS, is a way to ensure that water spreads out over the entire length of the VFS, reducing erosion and maintenance and improving function.
Construction
Construction is simple:
- Excavate a 9-inch wide by 6-inch deep trench the entire length of the vegetated filter strip.
- Place an impermeable liner vertically along the downstream side (VFS side, not pavement side) of the trench. As long as you don’t place any liner on the bottom of the level spreader facility, your VFS should still be properly sized.
- Place clean, uniformly graded (i.e. all the same size) crushed aggregate in the trench. If crushed aggregate is not aesthetically pleasing, first place 4” of crushed rock then top with 2” of pea gravel.
Specifications
- Any crushed aggregate where all the pieces are about all the same size (i.e. uniformly graded) will work for this application.
- Avoid rounded river rock mined from waterways, which causes erosion in the stream channel where the material is removed and impacts water quality. There are other alternatives. Over geologic time periods, rounded river rock can be deposited far from a waterway where it can be mined. This source of rock is better for protecting overall watershed health.
- Install liners per manufacturer recommendations. For filtration facilities or any other purpose, use:
- 30 to 60 mil (mm) EPDM rubber (ethylene propylene diene monomer)
- bentonite clay mat
- 30 to 60 mil (mm) LDPE (Low density polyethylene) plastic (aka pond liners)
- Avoid asphalt products, which are subject to degradation from soil microbes. Avoid PVC (poly vinyl chloride) which is more polluting than the EPDM, LDPE, and bentonite clay.
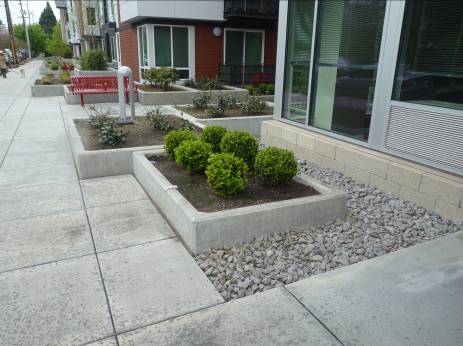
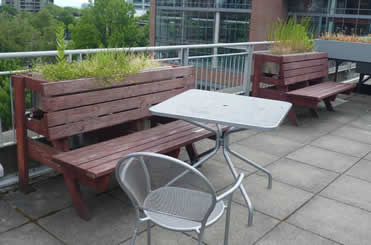
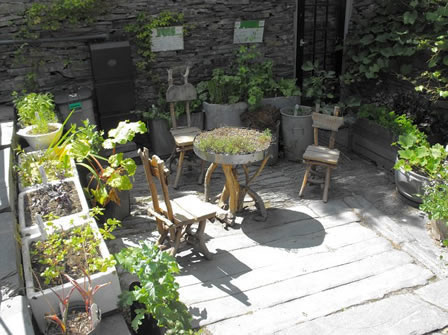
Contained Planters
Contained Planters are an easy way to disconnect impervious area and improve aesthetics anywhere. Put a potted plant anywhere there is unused pavement or a roof. Acting much like green roofs, contained planters can reduce annual runoff by 40% to 60% from the area on which they are placed.
Design
Container Materials
The container can made of anything you like as long as it can drain from the bottom. Since these will be outside year-round, consider durability.
Soils
Consider using a native soil or an amended native soil instead of store bought potting soil because:
- Having adapted over geologic times, native plants are usually healthier and thrive better in native soil.
- Potting soil is designed to over-nourish plants. As rainfall runs quickly through potting soil, it leaches nutrients out, which will be carried downstream to impact water quality.
- Potting soil is sterile. Plants benefit from microbes, mushroom roots (mycorrhizae), and larger soil animals like beetles, which move and process nutrients and preserve permeability. If you do use potting soil, throw a handful of organic (dark colored) soil into the pot.
- Potting soil is usually less dense than native soil, which makes it less resistant to temperature swings and won’t reduce runoff as much.
If your native soil is clay and the water table isn’t too high, you could successfully put a native plant right into the clay soils with no amendments and it would do fine. This is done in watershed restoration projects all the time. However, since you’ll be disturbing all the structure of the soil to put it into a container and since clay isn’t that easy to work with, you may consider amending it with compost.
If your soil is sandy, folding in some compost and even a little clay will help slow water as it passes through. The soil will hold more water for the plant later as well.
For any kind of soil, you might consider mycorrhizal treatments to make your plantings more resilient and to reduce water demand. Most plants in the Five Counties region (and outside it) have co-evolved with this mushroom root material. You can buy these amendments as pellets or water soluble powder. Mushroom roots interact with the plant roots by feeding on the plant’s waste and by bringing the plant nutrients, thereby expanding the effective root area of the plant by many fold. Plants receiving this kind of amendment consistently grow bigger and faster than plants without it.
For contained planters on roofs with adequate structural integrity, you may want to consider purchasing engineered lightweight soil mixes. Lightweight mixes are usually 80 – 90% lightweight stone, like pumice or expanded shale. Look for a mix with amendments that include mycorrhizal fungi, biota, and a natural carbon source like jute that will degrade slowly over time. Some mixes have water holding pellets that will reduce water demand. Green roof practitioners in Europe are successfully using native soils on roofs. If your roof can take the extra weight, this would be ideal for a contained planter. Again, consider the wetted weight of your soil when determining structural capacity. Before placing contained planters on roofs, make sure that the roof is strong enough to support the container, the soil, the mature plants, and the weight of the water that will temporarily be filling the voids of the soil. If the container gets clogged for some reason, the roof must be able to withstand the weight for a potentially long period of time. If living in cold climates, consider the snow load as well. Check with the local county building department for snow load information for roofs.
Plant Choices & Soil Depth
All kinds of plants are suitable for use in contained planters, although perennials that won’t require much irrigation after an establishment period of 2 – 3 years are preferred. Take care to avoid the numerous invasive plants (i.e. noxious weeds) such as periwinkle (vinca minor or major), English ivy, and yellowflag iris that may be sold at your nursery. For more information on plant choices and needs, see “9 Finding Native Plants in Your Area”.
Generally, the more soil, the better it will be for the plant. Provide enough soil at the start so that at maturity, roots have access to the soil volume they need. Too little soil can stunt the size of the plant. However, this is sometimes used as a landscape design approach. For instance, a Ponderosa Pine in a small container will stay small and will survive, but may be high maintenance.
For plants to reach full maturity and be low maintenance, soil depth requirements vary with the plant type. Soil depth rule of thumb minimums are as follows:
- Grasses: 12”. Generally, the roots of grasses and grass-like plants will be as deep as the plant is tall.
- Shrubs: 18”, but 24” is preferable.
- Trees: 36”, but depending on the species, trees also need a minimum volume of soil, 400 to 1,000 cubic ft. Since tree roots don’t usually extend much beyond 3 ft, the minimum area needed is 133 to 333 square ft.
- Vegetables would be fine in these containers, but rooting depth probably varies widely, so search the internet for guidance. Consider the size and weight of vegetables when designing your project.
Construction
Find a suitably sized, sturdy container. Fill it with soil. Put your plant in it. It’s almost as simple as that.
Correct Planting Techniques
Plants from nurseries can often be root-bound in their pots. If the roots aren’t loosened and unwound, the roots will continue to twist around in the hole you planted them in instead of growing downwards and outwards. Another key to low maintenance plant establishment is to ensure that the roots have good contact with the soil.
To properly plant potted plants:
- Fill your container up with soil to the desired depth leaving an inch or two to the top of the container.
- Dig a hole twice the size of the pot the plant comes in. Keep the soil pile nearby and clear of leaves and other surface debris.
- Take note of where the potting soil level is compared to the stem of the plant. Many plants have a different color and texture on the section that sits below the soil than on the sections that sit above ground.
- Gently shake the potting soil off as much of the roots as possible. The nutrition from the potting soil has probably been exhausted.
- For balled and burlapped trees, the soil may be left in. However, ensure that burlap or any other confining material will not impede root growth by removing at least the bottom half of the material.
- Loosen the roots.
- Taking some of the soil you dug out, create a mound at the bottom of the hole and lightly tamp it down.
- Drape the plant roots around the mound so that they’re touching the mound on the bottom and pointing downwards. There are two kinds of roots, larger structural roots and tiny feeder roots, which is where the plant “drinks” and “eats”. In pot-bound plants, some roots may be really long and will just continue winding around the other plant roots. If they’re feeder roots, shorten them by pulling them off to be a similar length as the other roots. A few of the bigger structural roots can be cut, but it’s better to dig a deeper hole and get them pointed downward.
- As you backfill the hole by pushing soil in around the tops of the roots, hold the plant so that the point at which the plant came out of the soil in its original pot will be the place where the final grade of soil in the contained planter will be (level of soil on the stem is the same). Plants that are too deep may drown or the stem may rot. Plants that are too high may not have enough feeder roots in the soil to survive.
- When finished, tamp down the soil. If the container is very large, step around the stem of the plant. This, combined with previous steps, will ensure good root contact with the soil.
- Place an organic mulch that meets the specifications in “3 Restore Disturbed Soils” to a depth of 2 to 3”. For woody stems on shrubs or trees, push the mulch a few inches away or the stems could rot.
Maintenance
Since contained planters are above ground, depending on the soil, they may be more subject to freezing and may drain faster than the soil around plants that are in the ground.
Maintenance of contained planters is similar to that of conventional landscape:
- Remove weeds twice a year.
- Replenish compost to a depth of 2-3 inches annually.
- Irrigate per the following guidance.
Establishment Period Irrigation
Irrigation of contained planters is easy if you followed step 1 (Correct Planting Techniques) during construction. Since the container will allow water to pond over the plant, it’ll be faster than watering a garden.
To establish perennial plants, you’ll need to irrigate more in the first year and less in subsequent years. In addition, plants benefit from changing irrigation with the seasons. After summer starts and the rains stop, water a little. Increase water volume as the dry season continues. Taper off irrigation as the rains start to come back. Depending on your area and rainfall patterns, irrigation may be needed from May to October.
The volume of water and frequency of watering varies with the type of plant. See “9 Find Native Plants for Your Area” for information on preferred growing locations and watering needs. Some rules of thumb:
- Trees: 5-10 gallons, once/week
- Shrubs: 3-5 gallons once/week
- Groundcover: 1-2 gallons, once or twice/week
- Perennial herbs: ½ gallon, twice/week
After the 2 – 3 year establishment period, irrigation should not be needed. However, contained planters will be placed over and presumably will be surrounded by impervious pavement or conventional (hot) roofs. This setting will probably require occasionally irrigation beyond the establishment period. You may reduce your water demand by hand watering, using efficient irrigation systems (drip), and harvesting rainwater. To make hand watering faster/easier, find a 1-2 gallon container, poke a few small holes in the bottom, and place it next to the stem of the plant. Fill the container as many times as needed. Having a bunch of them already placed around the plants allows you to quickly move from one plant to another without having to wait for the water to soak in. This quickly delivers ideal volumes without causing erosion. For more information on rainwater harvesting, see “5 Build a Rain Barrel” and “6 Harvest Rainwater in Cisterns”.
Fertilizing
Avoid P-K-N (potassium –phosphorus – nitrogen) as these are common pollutants found in waterways and will easily dissolve in water, flow out of the container bottom onto an impervious surface, and likely into a pipe that drains to a waterway. Replenishing the 2-3” of organic compost every year will provide adequate nutrition slowly and safely. Grasses are self-fertilizing, since 30% of their roots die off every year.
Permits
Permitting varies, so check with your local jurisdiction’s building or development services department to find out what codes may apply to your project. Retrofits using these practices will likely not require permits, but new development likely will. In addition, where stormwater management is required, clarify relevant calculations such as detention to confirm where you can subtract areas where you will install stormwater management practices from the total project area that you may have to detain or otherwise treat.
If information in this guidance conflicts with your jurisdiction’s requirements or approach, then follow their guidance instead.
Bibliography
City of Portland. How to Manage Stormwater: Downspout Disconnection. Stormwater Management Guidance. Portland, OR: Bureau of Environmental Services publication BS 07011, n.d.
Emanuel, Robert, Derek Godwin and Candace Stoughton. The Oregon Rain Garden Guide. Stormwater Management Manual. Salem, OR: Oregon State Univesity, 2010.
Southeast Michican Council Of Governments. Low Impact Development Manual for Michigan: A Design Guide for Implementers and Reviewers. Stormwater Management Manual. Detroit, MI: Southeast Michican Council Of Governments, 2008.
Photo Credits
Photos 1-8: Maria Cahill, Green Girl Land Development Solutions.
Photo 9: ©Ken Cook, Flickr.
Photo 10: ©Penny Mayes.
All photos licensed for reuse (Creative Commons).
Download/View the 5C Program Stormwater Management Handbook:
Download by Chapters:
For more information, contact us
©2012. Five Counties Salmonid Conservation Program and Green Girl Land Development Solutions. The 5C Program Stormwater Management Handbook may be photocopied or reprinted in its entirety for noncommercial purposes.
Back to Land Use Planning page
Back to Programs Page
|