Rain Gardens are shallow depressions (bowl-shaped or linear) that treat stormwater with soil and plants though ponding (aka bioretention). To protect water quality and create a low maintenance facility, a rain garden should be built in the right place. For more information, see "8: Site Bioretention for Infiltration".
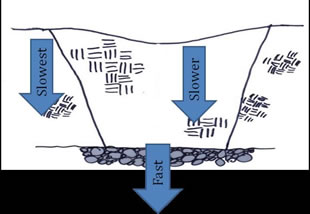
Rain gardens have a range of complexity, from very simple to highly engineered. Let’s take a tour of some details and in what situations you will probably want to use them. Rain Gardens should not be built in soils with an infiltration rate (how well they absorb and allow water to pass through) of less than 0.5 inch/hour. See Figure 2 below for an illustration. Other constraints on your site may limit the use of rain gardens; see “8 Site Bioretention for Infiltration”. Guidance here refers to native infiltration rates of soils. Infiltration testing is essential for the proper design and functioning of rain gardens. For more information on infiltration testing and soil texture analysis, see “7 Test Your Soil”.
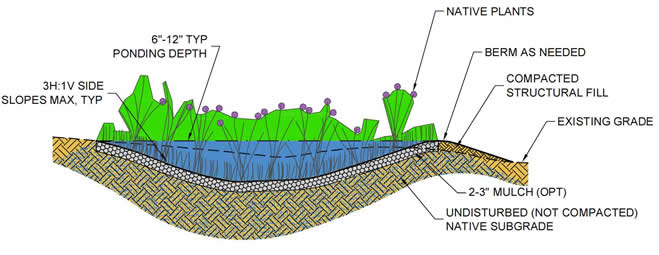
A simple infiltration facility per Figure 1 below may be used when all of the following criteria are met:
Area drains and piping are available at your local hardware store. A 12” x 12” box for the area drain will be sufficient for rain gardens managing less than 10,000 square feet of drainage area, as described below. A plumbing permit will probably be required to install the area drain and overflow pipe and to connect the pipe to an approved disposal point, such as a public pipe in the right-of-way or a waterway. Connection to an underground perforated pipe will require a permit for a Class V Underground Injection Control (UIC) through the California Department of Conservation, see http://www.consrv.ca.gov/dog/general_information/Pages/class_injection_wells.aspx for more info.
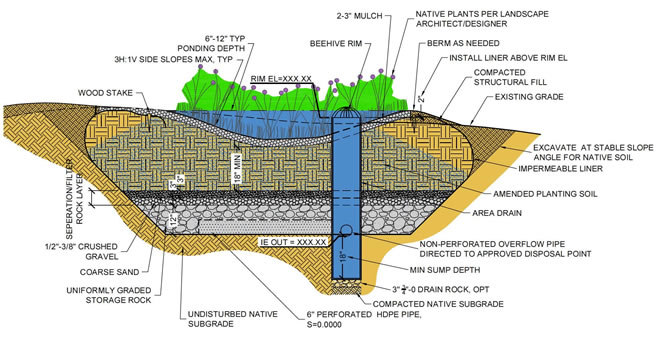
A lined filtration facility (see Figure 6) may be chosen when siting criteria for infiltration cannot be met (See “8 Siting Bioretention for Infiltration”). However, these are not very effective at protecting watershed health and can be very expensive. Consider other practices in other fact sheets provided by the Five Counties Salmonid Conservation Program before choosing a filtration rain garden (see “Navigating 5C Resources”).
Once you’ve chosen the right type of facility, you’re ready to design it in detail.
- The minimum depth of any required soil amendment should be 18 inches. For more information on amending soils, see “10 Amend Soils for Bioretention”.
Sizing Rain Gardens
While there are many elements that dictate the size of a rain garden, following this guidance, to size a rain garden in the Five Counties area, you only need to know:
- The infiltration rate of your native or amended planting soil. See “7 Test Your Soil” AND
- The drainage area (see next section).
Finding Your Drainage Area
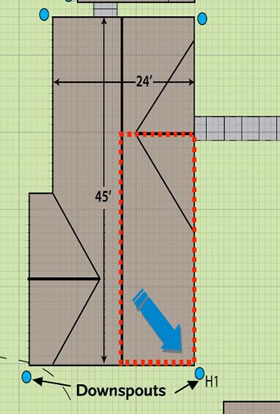
Decide which impervious and pervious areas you’d like to manage using a rain garden. Measure the areas and add them together to give you the square feet of surface area to be treated. See Figure 7 for an example. The rain falling on the part of the roof outlined in red drains into downspout H1 and could be directed into a rain garden.
Width of Surface Area x Length of Surface Area = Area (square feet)
Example: roof area draining to downspout H1 is 30‘ x 12’ = 360 square feet of roof area.
Applying Sizing Factors
We’ve done the engineering and modeling for you. Now, all you have to do is multiply the drainage area you just found by the right sizing factors below.
Table 2 Rain Garden Sizing Factors
Infiltration Rate (inches/hour) |
Sizing Factor |
Under 0.5 |
not applicable |
0.5 – 0.9 |
0.09 |
1.0 – 1.4 |
0.05 |
1.5 – 1.9 |
0.04 |
2.0 – 5.9 |
0.03 |
6.0 – 11.9 |
0.02 |
12.0 and over |
0.01 |
Example: For a roof area of 360 square feet and an infiltration rate of 2.7 inches/hour, your rain garden should be 10.8 square feet (360 ft2 x 0.03 = 10.8 ft2). Remember that it has to be constructed with 3:1 side slopes, so for a 10.8 ft2 rain garden, you need a ponding depth of at least 7” according to Table 1.
Sizing Factors for Regions with Seasonally Frozen Ground
If the soil in the facility is frozen, then it's probably snowing, not raining. However, there will be a time when it's raining and the ground is still frozen, of course. At this time, soaking a rain storm into the soil will be impossible. We recommend that rain gardens in these regions be large enough to store the entire volume of runoff from a site for the water quality storm, which constitutes the most frequent, most polluted flows. For these regions, use ponding depth of 12” and build the facility to be 15% (Sizing Factor = 0.15) of the contribution area.
Pretreatment
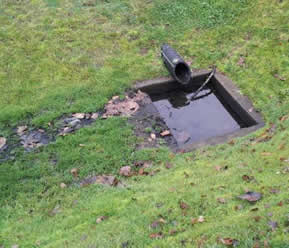
Treat stormwater before it enters a facility by settling out sediment and trapping trash in order to extend the life of the facility and reduce maintenance times. This is done by concentrating potential clogging agents into one place for easy removal. Where stormwater enters a facility in a concentrated fashion (i.e., everything except what flows in sheets over the surface – aka overland), use a sump (see Figure 8). A 4’ wide vegetated filter strip of grass (with less than 5 percent slope) can be used to treat overland flows (see “2 Disconnect Impervious Areas”).
Conveyance
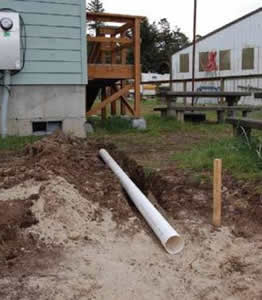
If needed, direct stormwater to and from bioretention facilities with piping per Plumbing Code requirements (see Figure 9 for example). Stormwater may also flow directly into or out of facilities via overland flow, along a curb, or in a conveyance swale (see “11 Conveyance Swales”). Overflow structures such as area drains should direct excess stormwater to an appropriate disposal point as approved by your County’s building or development services.
Gutters, downspouts, extensions, rain chains (see Figure 10), area drains, and other components used to move stormwater around the site should be durable and non-polluting. Plastic, like all petroleum products, is broken down by UV light and microbial action in soil. Choose materials that are UV and rust resistant. For conveyance, avoid these materials, which contain pollutants (listed in parentheses):
- Copper (copper)
- Galvanized steel (zinc)
- Iron (rusted iron)
Water moving over or through these materials picks up soluble (dissolved) portions of the metals that pollute ground and surface waters.
Better materials to use for conveyance include:
- Stainless steel
- High density polyethylene (HDPE)
- Aluminum
Rain Gardens on Slopes
Check dams are sometimes used in linear shaped facilities to pond water and prevent erosion on slopes.
- The top elevation of the check dam should not be so high that water cannot overtop it and flow into the next cell but also not so low that the design ponding depth is not achieved.
- On slopes exceeding 5%, install check dams made of:
- Concrete
- Stone
- Piled crushed rock (may not be appropriate where vandalism is likely).
- Avoid using the following materials for check dams: These contribute a variety of pollutants to stormwater after it enters the facility.
- Metals, except stainless steel
- Crushed concrete
- Bare compacted clay or soil
- Wood
Underdrains
Underdrains are perforated pipes, usually located at the very bottom of a facility, that ensure water drains within a reasonable period of time to keep the plants alive or to ensure the facility is ready for the next storm. Keep the following in mind:
- Underdrains are necessary in filtration facilities.
- Underdrains should not be wrapped in geotextile fabric. Instead, a rock separation layer (as shown on the figures above with underdrains) should be used. Geotextile fabric placed under soil is likely to clog and cause a failure.
- Access to underdrains should be provided via a cleanout or outlet structure (such as an area drain or catch basin).
Plantings
The interaction of soil, plants, and the beneficial microbes that concentrate on plant roots is what ultimately removes or reduces pollutants -- the more plants, the more treatment. A large variety of plants have been used successfully in rain gardens. The USDA PLANTS Database is a helpful tool to find plants appropriate for your area. For a tutorial on using the USDA PLANTS Database, see “9 Find Native Plants in Your Area”.
Use the following criteria to choose plantings:
- Plants native to California and preferably to your county. In most cases, non-native seeds and rhizomes/roots can greatly impact the habitat potential and water quality of downstream waterways.
- Don’t plant non-natives, invasives, or noxious weeds. For a list of invasive and noxious weeds, visit http://plants.usda.gov/java/noxious?rptType=State&statefips=06. Seeds disperse downstream during flooding in natural wetlands. These plants will not function in the same way, hydrologically or ecologically, as natives. Some invasives, such as perwinkle (vinca minor or major), English ivy, and yellowflag iris may be sold at your local nursery. However, invasives cost American farmers and consumers billions of dollars a year in management and lost crop yields.
- Any type of native plant – grass, sedge, rush, flowers and other forbs, trees – will be ecologically beneficial.
- Consider safety and “eyes on the street”/”neighborhood watch” benefits when locating taller, dense shrubs.
A dense mix of plantings, thoughtfully placed, in bioretention facilities is critical to successful stormwater function, prevents erosion and weed invasion, and enhances aesthetic value. Use the following minimum criteria:
- Per 100 square feet of rain garden, place:
- 115 herbaceous plants, 1’ on center spacing, ½-gallon container size OR
- 100 herbaceous plants, 1’ on center spacing, ½-gallon container size and 4 shrubs, 2’ on center, 1-gallon container size
- Per 300 square feet of rain garden, consider placing 1 tree, 2-gallon container size by 2 feet tall.
- Place plants throughout the facility, but especially in the bottom of the facility. Avoid a dry creek bed look. This approach will effectively treat the small, frequent storms that have ponding depths so shallow that the water may never reach the plants on the side slopes.
- Consider the plants’ spread (i.e. width) and height at maturity or you may find yourself excessively pruning in the future.
Considerations for Your Setting
Put the right plant in the right place. Many microclimates mixing sun/shade, windy/protected (from wind), and dry/wet are likely to be created by a small site with a building and a few trees on it. In addition, a rain garden will have its own microclimates. For instance, rain gardens have three zones of moisture: the bottom, wettest area; the drier middle; and the driest top. See Figure 12 at right.
High Summer Temperatures: In areas where temperatures are higher than 90 degrees Fahrenheit, some plants in sunny locations with fast-draining soils will need supplemental irrigation—at least for the first two or three years while roots are becoming established.
Cold Winter Temperatures: Many plants can tolerate freezing temperatures. Choose plants adapted to these conditions. Plants may not establish new roots well in frozen soils. Plan to construct and plant your garden early enough in the late summer to allow for plants to become established.
High Wind: Strong winds can dry out and damage plants any time of the year. Provide for shelter, or plan your plant selections to take account of the wind damage. Additional water may be necessary during the summer months, when drying winds can be most damaging for newly established rain garden plants.
Sandy Soils: Some beach homes are built on fossilized sand dunes. Soils on and around these geologic features will drain extremely rapidly, often in excess of 2 inches per hour, making a rain garden unnecessary or impractical. Furthermore, the additional water from a rain garden built on a fossilized dune may cause it to slump or even collapse. We do not recommend constructing a rain garden under these conditions.
Semi-Arid & Fire-Prone: If you live in a fire-prone area, avoid using plants in your rain garden that are flammable. Plants with dry material (such as leaves or needles) and those with fine structure, aromatic leaves, loose bark, or resinous sap tend to be flammable. Consult your local University of California Cooperative Extension office for more information and a list of fire-resistant plants.
These semi-arid regions have long, dry summers with very little rainfall. Depending on your plant choice, it may be necessary to irrigate your rain garden two to three times each summer to keep the plants healthy, attractive, and fire-resistant.
Mulch
Mulch, 2-3 inches deep, is often used to completely cover the soil and prevent erosion or weed intrusion.
Acceptable materials include:
- Wood chips
- coarse compost on bottom and sides
- fine compost on sides
Materials to avoid include:
- Bark dust or bark chips. Bark floats, polluting downstream waterways and making lawn overflow areas difficult to mow.
- Sawdust or grass clippings. These will break down quickly, robbing the soil of nitrogen.
Constructing Rain Gardens
Like all stormwater management facilities, care must be taken to properly construct rain gardens. Mistakes in construction can lead to unintentional damage to the facility (i.e., clogging) or to long-term maintenance challenges (i.e., plant replacement).
Amending Soils
Never fold sand alone into clayey soils. With insufficient quantities of sand, doing this is likely to cement the soil, creating a barrier to water and infiltration. See “8 Amend Soils for Bioretention” for more information on construction techniques for soil amendment.
Infiltration Rain Gardens
To properly construct an infiltration rain garden:
- Call 811 to locate private utilities on your site to make sure your work will not impact them. For setbacks and other considerations, see “8 Site Bioretention for Infiltration”.
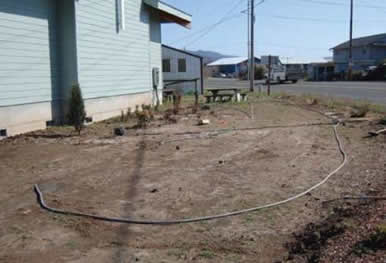
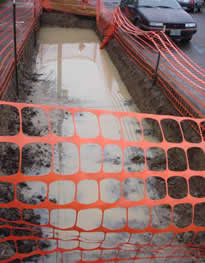
- Delineate the rain garden (see Fig 13). Fence off the infiltration area with a cyclone fence (if possible) or orange construction fence (see Fig 14) to prevent vehicular and foot traffic that will compact soils and reduce the infiltration rate of the native soils.
- Install temporary erosion control such as erosion control fabric, temporary seeding, biobags, wattles, and compost berms. Make sure any erosion control method you choose is weed-seed free. Avoid plastic, especially plastic mesh, where possible since amphibians and other animals are harmed by it.
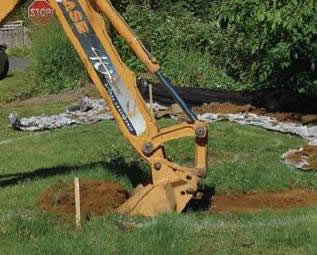
- When excavating with machinery, use track equipment and/or excavate from the sides of the infiltration area (see Fig 15).
- Amend the soils as desired or required (see previous section) especially if the soil has been compacted despite your best efforts.
- Protect native soils and amendments from rain exposure by covering with jute or other natural, breathable material or by waiting until the last moment to expose soils. If soils are exposed to rain, fine soil particles will be picked up and moved around. This may clog the native soils beneath creating a layer naturally impervious to water. In clayey soils, this can be difficult to fix. If soils don’t clump, rake the surface to loosen soil before proceeding. If soils do clump, follow compost guidance in “8 Amend Soils for Bioretention”.
- Rake or compost amend a rain garden that was dug by hand since foot traffic in the facility area is probably unavoidable.
- Plant the facility and protect it from stormwater flows for 3 months after planting using sand bags to block flows or piping around the facility. This will help plants to establish and prevent erosion.
- Mulch, if desired. While plants are small, mulch can make weeding easier, but it can also float out of the facility, carrying pollutants downstream with it. Remember to make your rain garden that much deeper, so your desired ponding depth is not decreased by mulch.
- Unblock inlets to allow stormwater flows to enter the facility 3 months after planting.
- Remove temporary erosion control if soil is stabilized.
- Water plants as needed through dry months for a minimum establishment period of 2 years.
Filtration Rain Gardens
To properly construct a filtration rain garden (see Figure 6 above for a helpful picture):
- Install temporary erosion control such as erosion control fabric, temporary seeding, biobags, wattles, and compost berms according to product directions. Make sure any erosion control method you choose is weed-seed free. Avoid plastic, especially plastic mesh, where possible since amphibians and other animals are harmed by it.
- Overexcavate 30 inches beyond the desired ponding depth. If stockpiling soil for another use, cover with a breathable fabric to prevent erosion and protect it against the clogging action of rain.
- Install the outlet structure (i.e. area drain, catch basin) or cleanout and non-perforated/solid pipe to the approved discharge point using standard construction techniques.
- Install impermeable liner of either 30 to 60mm (mil) low density polyethylene (LDPE) or bentonite clay mat per manufacturer guidance. If a plastic liner will be used, make sure that it's a single, solid piece of plastic big enough to be installed underneath the entire facility area. Overlapping plastic sheets will not adequately prevent infiltration of water. If you choose to line the facility with a bentonite clay mat, installation is relatively simple. Make sure that the liner is installed high enough –at a height equal to the depth of water that may be ponded in any storm, not just the design storm. Attach the liner to the outlet structure with the appropriate adhesive or mechanically.
- Place a 6” or 8” diameter perforated HDPE (high density polyethylene) underdrain pipe on the bottom of the facility and connect it to the outlet structure.
- Place 12” of clean, open-graded (i.e. all the same or very similar size) 1.5” to 1” diameter crushed gravel throughout the bottom of the facility.
- Place 3” of clean, open-graded ½” to 3/8” diameter crushed gravel over the rock placed in Step 6.
- Place 3” of clean, open-graded coarse sand over the rock placed in Step 7.
- Create or buy an amended planting soil mix that allows water to infiltrate at a ra te between 2” to 12”/hour.
- Place the amended planting soil in two lifts, saturating each lift with water to lightly compact it (i.e.85% compaction). Boot packing or light tamping may also be used but never apply vibratory compaction.
- Place a final lift as needed to reach desired elevations.
- Plant the facility and protect it from stormwater flows for 3 months after planting using sand bags to block flows or piping around the facility. This will help plants establish and prevent erosion.
- Mulch, if desired. While the plants are small, mulch can make weeding easier, but it can also float out of the facility, carrying pollutants downstream with it. Remember to make your rain garden that much deeper, so your desired ponding depth is not decreased by mulch.
- Unblock inlets to allow stormwater flows to enter facility 3 months after planting.
- Remove temporary erosion control if soil is stabilized.
- Water plants as needed through dry months for a minimum establishment period of 2 years.
Planting Techniques
Proper planting techniques can greatly reduce maintenance. Plants from nurseries can often be root bound in their pots. If the roots aren’t loosed and unwound, the roots will continue to twist around in the hole you planted them in instead of growing downwards and outwards; this will eventually starve them. Another key to low maintenance plant establishment is to ensure that the roots have good contact with the soil.
To properly plant potted plants:
- Dig a hole twice the size of the pot. Keep the soil pile nearby and clear of leaves and other surface debris.
- Take note of where the potting soil level is compared to the stem of the plant. Many plants have a different color and texture on the section that sits below the soil than on the sections that sit above ground.
- Gently shake the potting soil off as much of the roots as possible. The nutrition from the potting soil has probably been exhausted.
- For balled and burlapped trees, the soil may be left in. However, ensure that burlap or any other confining material will not impede root growth by removing at least the bottom half of the material.
- Loosen the roots.
- Taking some of the soil you dug out, create a mound at the bottom of the hole and lightly tamp it down.
- Drape the plant roots around the mound so that they’re touching the mound on the bottom and pointing downwards. There are two kinds of roots, larger structural roots and tiny feeder roots, which is where the plant “drinks” and “eats”. In pot-bound plants, some roots may be really long and will just continue winding around the other plant roots. If they’re feeder roots, shorten them by pulling them off to be a similar length as the other roots. A few of the bigger structural roots can be cut, but it’s better to dig a deeper hole and get them pointed downward.
- As you backfill the hole by pushing soil in around the tops of the roots, hold the plant so that the point at which the plant came out of the soil in its original pot will be the place where the final grade of soil in the contained planter will be (level of soil on the stem is the same). Plants that are too deep may drown or the stem may rot. Plants that are too high may not have enough feeder roots in the soil to survive.
- When finished, tamp down the soil. Step around the stem of the plant. This, combined with previous steps, will ensure good root contact with the soil.
Place an organic mulch that meets the specifications in “3 Restore Disturbed Soils” to a depth of 2 to 3”. For woody stems on shrubs or trees, push the mulch a few inches away or the stems could rot.
Rain Garden Care & Maintenance
Proper maintenance is required to ensure proper functioning and especially that water is able to enter the facility at all times of the year. Observing the facility during a variety of rain events will help you see where water is and isn’t flowing. Maintenance requirements are typical of vegetated areas; structures like sumped catch basins are typical of conventional infrastructure maintenance. Watering and weeding may be needed frequently within the first 1 to 3 years during California’s very dry summers, but this should taper off dramatically if you choose plants that require little to no watering after establishment.
Establishment Period Irrigation
To establish perennial plants, you’ll need to irrigate more in the first year and less in subsequent years. In addition, plants benefit from changing irrigation with the seasons. After summer starts and the rains stop, water a little. Increase water volume as the dry season continues. Taper off irrigation as the rains start to come back. Depending on your area and rainfall patterns, irrigation may be needed from May to October.
The volume of water and frequency of watering varies with the type of plant. See “9 Find Native Plants for Your Area” for information on preferred growing locations and watering needs. Some rules of thumb:
- Trees: 5-10 gallons, once/week
- Shrubs: 3-5 gallons once/week
- Groundcover: 1-2 gallons, once or twice/week
- Perennial herbs: ½ gallon, twice/week
After the 2 – 3 year establishment period, irrigation should not be needed. However, contained planters in developed settings will probably require occasionally irrigation beyond the establishment period
You may reduce your water demand by hand watering, using efficient irrigation systems (drip), and harvesting rainwater. To make hand watering faster/easier, find a 1-2 gallon container, poke a few small holes in the bottom, and place it next to the stem of the plant. Fill the container as many times as needed. Having a bunch of them already placed around the plants allows you to quickly move from one plant to another without having to wait for the water to soak in. This quickly delivers ideal volumes without causing erosion. For more information on rainwater harvesting, see “5 Build a Rain Barrel” and “6 Harvest Rainwater in Cisterns”.
Recommended Rain Garden Maintenance
Inspect the facility a minimum of 4 times per year and perform needed maintenance as follows:
- Contribution areas should not add pollutants to runoff in excessive amounts.
- Pavement and roofs should not be treated with polluting materials such as moss poisons (mossicides) or coal tar sealants.
- Landscape areas and lawns should be maintained with integrated pest management, using hand pulling and other means first and herbicides, pesticides and mossicides last.
- Downspout pipes or other inlets should maintain a calm flow of water entering the facility.
- Erosion sources should be identified and controlled when soil is exposed or erosion channels are forming. Rip rap or other effective material should be placed around the point where water is discharged into the facility to slow the water and prevent erosion.
- Sediment and debris should be removed from:
- The pretreatment sump
- The facility’s surface, being careful not to damage vegetation. Accumulated sediment should be removed if it is more than 1" thick or if it is damaging vegetation.
- The facility’s outlet (i.e., overflow drain or conveyance swale).
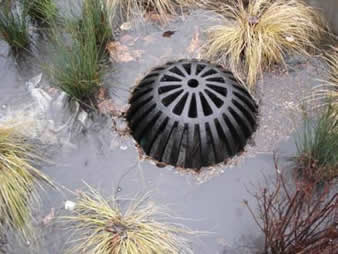
- Inlets. Because the storms in the Five Counties area for which you would design your facility are frequent and small, flows are very shallow. Some kinds of inlets (see Figure 19) may block water from coming into the facility at very small depths (less than 1/8”).
Debris and soil from rain gardens is not considered hazardous and can be disposed of in the landfill.
- Slopes should be stabilized and planted using appropriate erosion control measures when soil is exposed or erosion channels are forming.
- Maintain the design ponding depth by:
- Repairing any structural elements that may leak from cracks or worn sealant.
- Maintaining the design elevation of check dams.
- Topsoil should allow stormwater to percolate uniformly through the rain garden.
- If the facility does not drain within 48 hours, scrape 1” of soil out of the facility and replace with amended planting soil that meets the specifications described in “8 Amend Soils for Bioretention”. Test the ability of the facility to infiltrate water in order to confirm drainage.
- If facility still does not drain after scraping 1”, you may try scraping another 1” deeper.
- If facility still does not drain after scraping the top 2”, till and replant the facility.
- Debris that inhibits infiltration of water should be removed routinely (no less than quarterly), or when it is discovered.
- Vegetation should be healthy and dense enough to filter stormwater while protecting underlying soils from erosion. Mulch should be replenished until vegetation is established and shades the bottom of the facility.
- Fallen leaves and debris from plants should be removed. But don’t string trim grasses, which will inhibit deep rooting and increase the probability of clogging (see Figure 21). Grasses may be raked.
Nuisance plants (i.e. those blocking the inlet) and non-native and invasive vegetation (such as weeds, Himalayan blackberries and English Ivy) should be removed when discovered.
- Dead vegetation and woody material should be removed so that it makes up less than 10% of the rain garden surface area. Vegetation should be replaced within 3 months, or immediately if required to maintain a cover density of at least 90%.and control erosion where soils are exposed.
- Spill prevention measures should be taken when handling substances that can contaminate stormwater. Releases of pollutants should be corrected as soon as they are noticed.
Permits
Permitting varies, so check with your local jurisdiction’s building or development services department to find out what codes may apply to your project. Retrofits using rain gardens will likely not require permits, but new development likely will as part of the larger project permitting. In addition, where stormwater management is required, clarify relevant calculations such as detention to confirm where you can subtract areas where you will install stormwater management practices from the total project area that you may have to detain or otherwise treat.
If information in this guidance conflicts with your jurisdiction’s requirements or approach, then follow their guidance instead.
Bibliography
Emanuel, Robert, Derek Godwin and Candace Stoughton. The Oregon Rain Garden Guide. Stormwater Management Manual. Salem, OR: Oregon State Univesity, 2010.
Godwin, Derek, Maria Cahill and Marisa Sowles. Rain Gardens. Fact Sheet. Salem, OR: OSU Extension, 2011.
Photo Credits
Figure 1: Candace Stoughton
Figures 2 - 5: Maria Cahill
Figure 6: Robert Emanuel
Figure 7: Maria Cahill
Figures 8: Robert Emanuel
Figure 9 – 10: Maria Cahill
Figure 11: Robert Emanuel
Figure 12: Maria Cahill
Figure 13: Robert Emanuel
Figure 14: Robert Emanuel
Figure 15: Candace Stoughton
Figure 16 – 17: Maria Cahill
Download/View the 5C Program Stormwater Management Handbook:
Download by Chapters:
For more information, contact us
©2012. Five Counties Salmonid Conservation Program and Green Girl Land Development Solutions. This ©2012. Five Counties Salmonid Conservation Program and Green Girl Land Development Solutions. This publication may be photocopied or reprinted in its entirety or in portions for noncommercial purposes. This publication is available in an accessible format on the 5C web site at http://www.5counties.org/docs.htm. If future documents are based on this document, credit should be given with the following wording: “Portions of this document are adapted from “04BuildRainGarden.doc, http://www.greengirlpdx.com/JOBS/5CSCP/04BuildRainGarden.doc ©2012, Five Counties Salmonid Conservation Program and Green Girl Land Development Solutions. No risk or liability by either of these organizations shall be assumed for information offered in this document.”
Back to Land Use Planning page
Back to Programs Page

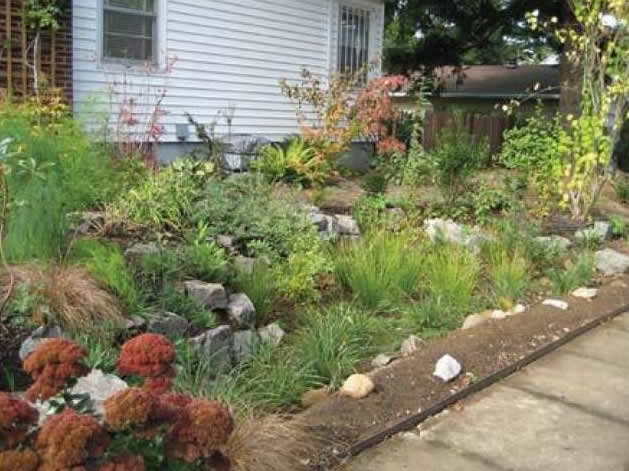
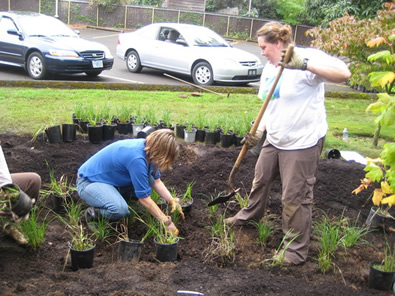 Figure 15: Figure 3 The more plants and the more variety of plants in a rain garden, the better the rain garden is likely to function.
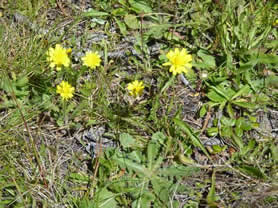 Figure 16: Since weeds need water in the summer but the right natives won't, substantial irrigation beyond the establishment period will increase weeds and maintenance.
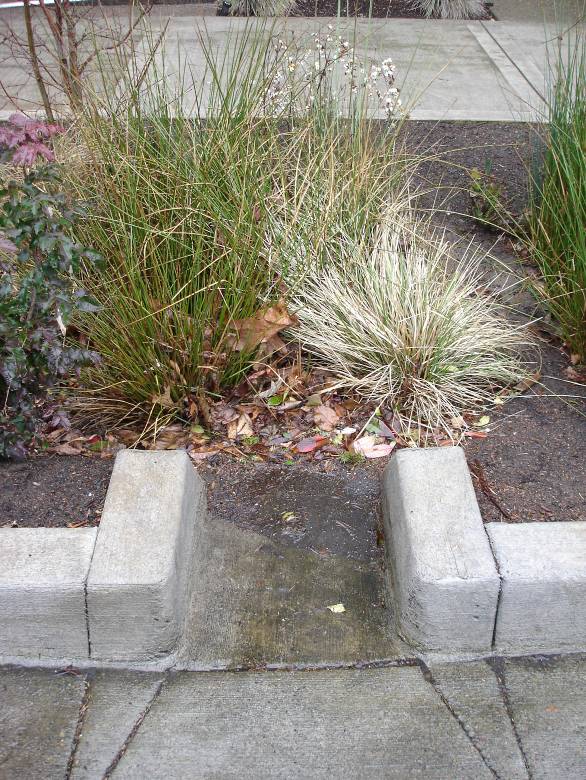 Figure 17: Because of a small amount of sediment and possibly too much vegetation right at the mouth of the inlet, the smallest, most frequent, and dirtiest flows are bypassing the inlet.